UV DTF transfer is a contemporary method that blends DTF printing with UV curing to create vibrant, durable designs on textiles and other substrates. For newcomers, understanding the transfer process and learning a straightforward heat press workflow can deliver reliable results from the start. This approach promises sharper color reproduction, faster curing, and fewer post-print steps than traditional methods, delivering reliable results with UV DTF printing processes. From core materials to essential equipment, the guide focuses on a simple, repeatable setup you can follow to achieve consistent results across projects, along with practical tips for workspace organization and safety. By leveraging the essentials of the setup and a clear workflow, beginners can start producing professional-looking transfers right away.
In other terms, this modern heat-transfer approach uses UV-curable inks applied to a carrier film before bonding to fabric. Think of it as a UV-cured print on a transfer film designed for adhesion under controlled heat and pressure, with attention to image opacity and fabric compatibility. Alternative expressions include a UV-enabled direct-to-film workflow, PET-based transfer media, and a heat-press process that emphasizes precise dwell times and temperature control. By framing the topic with terms such as UV-curable printing on textiles, direct-to-film media, and substrate-ready workflows, you align with common search terms across related topics.
UV DTF Transfer: Core Materials and Beginner Setup
Starting with the right UV DTF transfer materials sets the foundation for quality outcomes. Choose a UV-curable ink system or a UV-capable DTF printer, paired with a transfer film designed for UV inks. This material combination influences colour vibrancy, cure speed, and adhesion, and aligns with the core concepts of UV DTF transfer materials you’ll rely on from your first projects.
For a simple, repeatable beginner workflow, organize your workspace and establish a baseline: select a substrate, decide on a transfer film, and set up a curing station and heat press. Even if you’re starting small, having the essential UV DTF transfer materials and equipment—printer, UV lamp or post-curing unit, and heat press—will help you reproduce consistent results from project to project.
Choosing the Right DTF transfer film and Inks for UV Printing
Choosing the right DTF transfer film and inks for UV printing is critical. Look for a DTF transfer film that is compatible with UV inks and can hold the ink through curing while accepting any finishing layer or powder. The film choice affects opacity, wash durability, and edge sharpness in your designs, especially on dark fabrics.
Pair the film with UV-curable inks that match your printer’s capabilities. If you’re using a UV DTF printer, confirm cure times and adhesion on your chosen fabric, and consider white underbase decisions for opacity. This aligns with UV DTF printing best practices and helps beginners avoid common issues like fading or misregistration.
UV DTF Printing Process: From Design to Cured Transfer
UV DTF Printing combines design work with a curing step that locks in colour before transfer. Prepare artwork in vector or high-resolution raster with a suitable color profile, and decide whether you’ll use a white underbase for darker substrates to maximize opacity on transfer film.
Print with UV inks on the transfer film, keeping ink density appropriate for the film and substrate. After printing, cure the design with a UV lamp or post-curing unit to harden the ink and reduce smudging. The cured print then moves to the transfer phase, balancing UV chemistry and heat transfer performance.
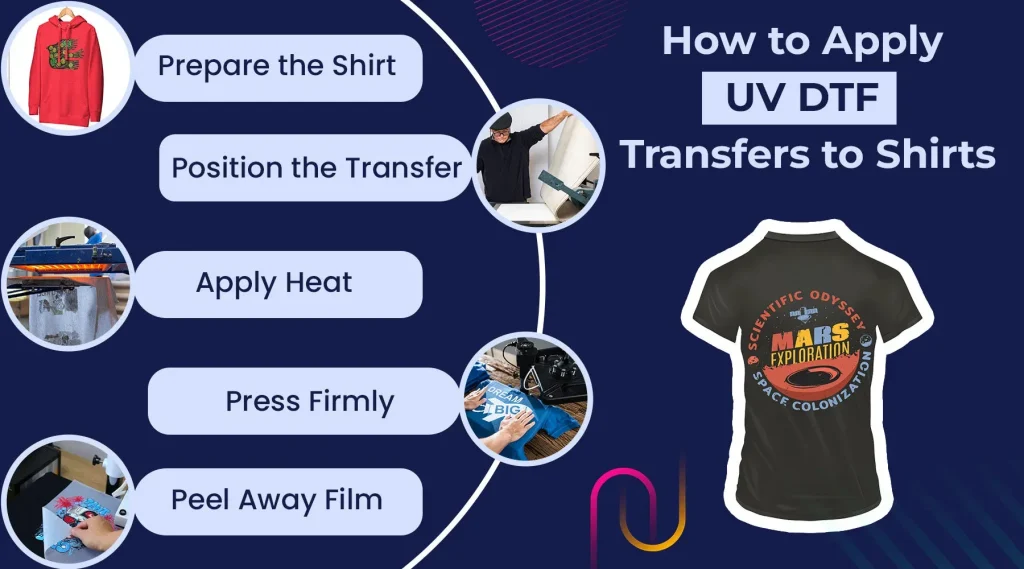
DTF Transfer Setup for Beginners: A Simple, Repeatable Workflow
DTF Transfer Setup for Beginners: A Simple, Repeatable Workflow provides a practical sequence you can follow as you learn. Step one is design preparation, step two is printing with UV inks on the transfer film, step three is curing, and step four is the optional powder adhesion step if your film requires it.
Next, prepare the garment, apply heat, and transfer the design using the manufacturer’s guidelines for temperature, time, and pressure. By documenting a baseline and refining as you go, you’ll build confidence and consistency in your DTF transfer workflow—precisely what beginners need to progress.
Optimizing Heat Press Settings for DTF Transfers
Optimizing Heat Press Settings for DTF Transfers means dialing in temperature, time, and pressure to suit your film and inks. The standard ranges for many UV DTF transfers are around 150–160°C (302–320°F) for 12–20 seconds, but always defer to the film and ink manufacturer’s guidelines to avoid issues like scorching or incomplete adhesion.
Ensure the heat press provides precise temperature control and uniform contact across the platen. Record test results for each film/ink combination, adjusting pressure and dwell time as needed. The right heat press settings for DTF are essential for reproducible results and durable transfers on a range of fabrics.
Maintenance, Safety, and Troubleshooting for UV DTF Transfers
Maintenance and safety play a crucial role in consistent UV DTF transfers. Store UV inks and films correctly, keep curing lamps clean, and follow the manufacturer’s safety instructions for powders, solvents, and UV exposure. A well-ventilated workspace and appropriate PPE reduce risk during curing and powder handling.
Troubleshooting tips focus on common issues like ghosting, cracking, or peeling. Verify substrate compatibility, curing time, and heat press settings, and maintain your equipment to minimize downtime. By following a safety-first approach and recording successful settings, you’ll extend the life of your UV DTF transfers and equipment.
Frequently Asked Questions
What is UV DTF transfer and how does it differ from standard DTF printing?
UV DTF transfer uses UV-curable inks on a transfer film with an immediate cure, delivering sharp colors and reduced post-print steps compared to traditional DTF printing. This approach can improve color stability and adhesion on certain fabrics when the curing is tailored to the film and ink specs.
What UV DTF transfer materials do I need as a beginner?
Key UV DTF transfer materials include UV-curable ink or a UV-capable DTF printer setup, a UV-friendly transfer film (DTF transfer film), white or clear transfer films for opacity, a suitable adhesive or powder if required, compatible substrates, and basic cleaning/safety gear to keep the workflow clean and safe.
How do I perform a DTF transfer setup for beginners when starting with UV DTF transfer?
For a beginner setup, ensure you have a printer capable of UV inks or a DTF printer with a UV post-curing option, a curing station or UV lamp, a reliable heat press, and a basic powder-application station if your process uses powder. Create a simple workflow: design, print on the transfer film, cure the print, pre-press the garment, transfer, and peel as directed by the materials.
What heat press settings for DTF should I use with UV DTF transfers?
Typical settings are around 150–160°C (305–320°F) for 12–20 seconds with even pressure. Always follow your specific film and ink manufacturer guidelines and adjust for fabric type, since UV DTF results depend on the combination of ink, film, and substrate.
What is the recommended UV DTF printing workflow?
Recommended workflow: design with a white underbase if needed, print using UV inks on the transfer film, cure the print with a UV lamp, apply powder if required, pre-press the garment, transfer at the specified temperature/time/pressure, and peel according to the film’s guidance to achieve best adhesion and color.
What are common challenges and how can I troubleshoot UV DTF transfers?
Common issues include smudging, color banding, ghosting, and curling. Troubleshoot by ensuring proper curing, calibrating ink flows and print heads, stabilizing the substrate, using correct pressure/temperature/time, and pre-pressing fabrics to remove moisture. If problems persist, revisit material compatibility and follow manufacturer recommendations for the UV DTF transfer film.
| Key Point | Overview |
|---|---|
| What is UV DTF transfer? | UV DTF transfer prints UV-curable inks onto a transfer film, followed by a curing step before transferring to textiles or other substrates; it emphasizes rapid cure to reduce smudging and improve color stability on certain fabrics. |
| Core materials | UV-curable ink or a UV-capable DTF printer setup; UV transfer film compatible with UV inks; white or clear underbase films; hot-melt adhesives or powder as required; suitable substrates; cleaning supplies and safety gear. |
| Essential equipment | Printer capable of UV-curable inks or a DTF printer with a UV post-curing option; curing station or UV lamp; a reliable heat press; powder application tools (if used); ventilated workspace. |
| Simple beginner setup steps | Design and prepare your artwork; print on the transfer film with UV inks; apply powder if required; cure the print; pre-press the garment; transfer with heat and pressure; peel according to film guidelines. |
| Tips for a smooth start | Calibrate printer and color settings; run tests on inexpensive fabric; keep the transfer area clean and dust-free; maintain a settings archive for each film/ink combo; follow safety and maintenance guidelines. |
| Common challenges | Uneven color or banding: check ink flow, print head alignment, and curing; cracking or peeling: verify substrate suitability and adequate curing; ghosting or misalignment: ensure substrate stabilization and use alignment marks; curling or wrinkling: pre-press and control heat/pressure. |
| Safety and maintenance | Store films and inks in cool, dark, dry conditions; clean printhead and curing equipment per schedule; work in a ventilated area and wear protective gear; dispose of waste responsibly. |
Summary
UV DTF transfer is a dynamic option for beginners seeking vibrant, durable results with a streamlined workflow. This method combines UV-curable inks printed on a transfer film with a curing step before the design is transferred to garments or substrates. Key factors include choosing a UV-capable printer or a DTF setup with UV post-curing, selecting compatible transfer film, and establishing a straightforward heat-press workflow. Beginners should focus on understanding the core materials, essential equipment, and a simple, repeatable setup to achieve consistent results from the first projects. With practice, you can expand your design range and fabrics while maintaining quality and efficiency. Proper safety practices and careful record-keeping of temperatures, times, and pressures will help you build a reliable UV DTF transfer workflow.