uv dtf transfer is a cutting-edge method for applying vibrant, durable designs to fabrics, especially T-shirts, and it sets new standards for brightness and wash-fastness in garment decoration, making it a compelling option for brands seeking bold, long-lasting prints, even in high-volume runs, and it is compatible with a wide range of garment brands and production scales. If you’ve explored other methods like direct-to-film (DTF) printing or traditional heat transfer, uv dtf printing on shirts can offer sharper detail, crisper color, faster curing, improved edge fidelity, and a softer hand feel that holds up to washing, which makes it attractive for startups and established shops alike. In this guide you’ll find practical dtf transfer tips and tricks, along with troubleshooting steps to nail uv dtf transfer on T-Shirts from setup to finishing, including printer calibration, film handling, heat-press profiling, and reliable post-press care, so you can reproduce results consistently. With the right inks, film, heat press settings, and curing protocol, you can achieve consistent results even across different fabrics, blends, and garment weights, while minimizing issues such as cracking, edge bleeding, or color shift after multiple washes, and you’ll enjoy a smoother production workflow. Understanding uv dtf ink curing is essential to prevent issues like color fading or stiffness and will help you maximize durability in real-world wear, while also supporting clean separation between colors and precise layering, leading to professional-looking tees.
Viewed through an LSI-informed lens, UV-based garment transfers can be described as film-on-textile applications powered by UV-curable inks, offering another way to think about this digital-to-fabric workflow. Alternative terms you might encounter include digital textile printing on apparel, film transfer for clothing, and heat-press transfer on fabrics, all of which point to the same class of customization technology. This framing helps connect related topics like ink curing, color management, and process troubleshooting within the broader field of textile decoration, reinforcing how the pieces fit together. Using these Latent Semantic alternatives improves discoverability for readers while preserving practical guidance on setup, curing, finishing, and care that you’ll find in this guide.
uv dtf transfer: A Modern Approach to Vibrant Shirt Graphics
UV dtf transfer opens a new category for applying designs to fabrics, especially T-shirts. For uv dtf printing on shirts, the combination of UV-curable inks and a transfer film yields brightness, sharp detail, and wash-fast durability that many other methods struggle to match.
Compared with uv dtf vs standard dtf, this approach often offers crisper edges and more color fidelity, provided you manage curing carefully. The key is proper uv dtf ink curing: the ink sets quickly under UV light, reducing smudges during handling but requiring precise timing to avoid stiffness or color dulling.
Core Materials and Setup for uv dtf Transfer
Core components include UV-curable inks, a compatible printer, a transfer film designed for UV inks, a heat press with precise controls, a teflon sheet, and silicone mat. When you consider uv dtf printing on shirts, the film quality and ink chemistry matter as much as press settings and substrate choice.
Setting up also involves calibration and color management. Use embedded color profiles (such as sRGB or Adobe RGB) and soft proofs to anticipate how the design will translate to fabric. In practice, applying dtf transfer tips and tricks during setup helps ensure edge definition and even color coverage across garments.
Design, Color Management, and Preparation for UV DTF
Design preparation for UV DTF requires high-resolution artwork, clean vector outlines, and, on colored shirts, a white underbase or white layer to maximize vibrancy. Embedding color profiles and soft-proofing helps predict fabric-specific shifts, supporting consistent results across batches.
Positioning and prepress are crucial: use templates to align artwork, smooth wrinkles with light heat, and remove stray fibers with a lint roller. Incorporating dtf transfer tips and tricks at this stage helps maintain sharp edges, reduces bleed risk, and improves overall print fidelity.
Troubleshooting Common uv dtf Transfer Issues
DTF transfer troubleshooting begins with identifying symptoms like fading, ghosting, or edge fuzz. Fading colors after washing often point to insufficient curing or underbase issues, while ghosting can indicate uneven pressure or premature lifting.
Cracking along seams, color bleeding, or blurred edges can stem from excessive heat, too much dwell time, or a wrinkled transfer. Practical fixes include verifying cure times, rechecking printer color profiles, cleaning films, and ensuring the transfer remains flat during application. Regular checks align with ongoing dtf transfer troubleshooting best practices.
Optimizing UV DTF Ink Curing for Durability
UV ink curing is central to durability. Post-print curing on the film sets the ink quickly, reducing smudges and improving color fidelity, while a subsequent cure during or after transfer helps the design withstand washing.
Environmental factors like humidity and air flow influence cure consistency. Use a stable UV lamp or LED cure system and consider dehumidification in humid spaces. These controls, combined with test prints, help ensure predictable uv dtf ink curing outcomes across lots.
uv dtf vs standard dtf: Choosing the Right Method for Your Project
uv dtf transfer often delivers crisper lines, richer color, and better photo-realistic results than standard dtf, especially on challenging textures or white underbases. It shines when you need vibrant color, fine detail, and fast turnaround with strong wash durability.
However, uv dtf can require higher upfront investment in UV-compatible equipment and careful calibration. For simpler designs, small runs, or budget-conscious operations, standard dtf or heat-transfer workflows might be more practical. Testing a few designs and evaluating total cost per garment can help you decide which method best fits your production goals.
Frequently Asked Questions
What is uv dtf transfer and how does it differ from standard dtf?
UV DTF transfer uses UV-curable inks printed on a transfer film and cured instantly under UV light, delivering sharp detail and durable colors for fabrics. In uv dtf printing on shirts, you benefit from strong color fidelity and minimal ink smudging during handling. Compared with standard dtf, UV DTF often offers crisper edges and better wash-fastness when properly cured.
What equipment and materials are needed for uv dtf printing on shirts?
Essential gear includes UV-curable inks and a compatible UV printer, a transfer film designed for UV inks, and a heat press with precise temperature and time controls. Also required are a teflon sheet, silicone mat, and substrates like cotton or blends, plus cleaning supplies and a curing light. Calibrate your printer and press and run a test print on a similar fabric before production.
What are common dtf transfer troubleshooting steps for uv dtf transfer issues?
Start with curing and film cleanliness: ensure the ink fully cures on the film and that the transfer film is clean and wrinkle-free. If you notice fading, ghosting, or edge cracking, adjust cure time, pressure, and dwell time, and verify any white underbase usage. Check mirroring, alignment, and post-press cooling to prevent edge issues.
How do I optimize uv dtf ink curing for consistent results?
Use a stable UV exposure with a reliable lamp and consistent distance to the film. Avoid overcuring, which can dull colors or make the print stiff; test different times and intensities to balance vibrancy and flexibility. Environmental factors like humidity should be controlled, and periodic calibration helps maintain consistent curing.
What are some dtf transfer tips and tricks for improving results with uv dtf transfer?
Always run test prints on scraps before full runs, use alignment aids and corner marks for consistency, and consider a white underbase on colored shirts to boost vibrancy. Keep the transfer film clean, cure after printing and after transfer if layering, and maintain your equipment to prevent defects.
When should I choose uv dtf transfer over standard dtf (uv dtf vs standard dtf)?
Choose UV DTF when you need vibrant color, fine detail, and strong wash durability, especially for photo-like imagery, gradients, or small text. It provides crisper lines and less color bleed than standard DTF but requires UV-capable equipment and careful curing. If you have budget or batch-size constraints, standard DTF may be more cost-effective.
| Aspect | Key Points |
|---|---|
| What is UV DTF Transfer | – UV-curable inks printed on a transfer film; – Transferred to fabric with heat and pressure; – Ink cures almost instantly for reduced smudging and improved color fidelity; – Ideal for detailed designs, photos, and bold typography on T-shirts; – Generally crisper lines, stronger color, and better resistance to cracking/fading when cured properly; – Compared with traditional DTG/DTf, offers sharper detail and vibrant colors. |
| Core Components & Setup | – UV-curable inks and a compatible printer; – Transfer film designed for UV inks; – Reliable heat press with precise temperature/time controls; – Teflon sheet and silicone mat; – Substrates (e.g., cotton or blends); – Cleaning/maintenance supplies; – Calibrate printer and heat press; run a mini-test on similar fabric. |
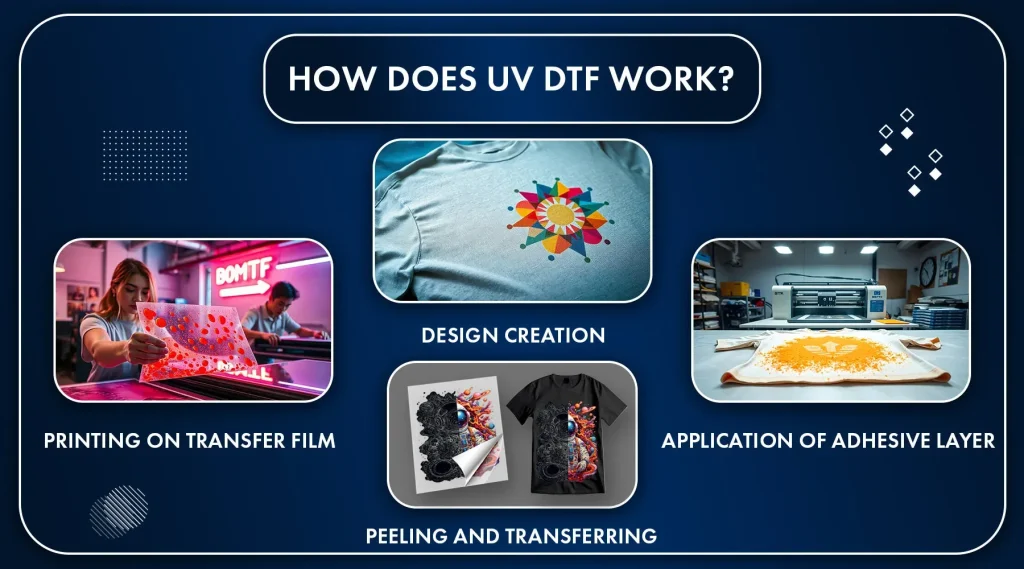
| How It Works | – Print design onto transfer film; – UV cure the printed film; – Cut/weed excess film; – Position transfer on garment and press with protective layer; – Cool or perform a brief cold/warm peel; – Post-press cure check and wash test for durability. |
| Design & Color Management | – Use color profiles (e.g., sRGB/Adobe RGB) and soft proofs; – Provide high-resolution artwork with clean vector outlines; – Consider a white underbase on colored shirts to boost vibrancy; – Ensure accurate color reproduction and sharp edges. |
| Positioning & Shirt Prep | – Align artwork with templates or grids for consistency; – Prepress shirt to remove wrinkles; – Use a lint roller to remove fibers; – For light designs on dark fabrics, consider a light underbase to enhance vibrancy. |
| Step-by-Step Process | 1) Prepare design and print on transfer film; 2) Mirror/verify image as needed; 3) UV cure the film; 4) Cut/weed; 5) Heat-press transfer with teflon cover at recommended temp/time; 6) Remove garment and allow to cool; 7) Optional post-cure wash test for durability. |
| Troubleshooting | – Fading after washing: verify cure time and water conditions; adjust underbase if used; – Ghosting: increase dwell time or adjust pressure and ensure film is flat; – Peeling/cracking: reduce heat/ dwell time or ensure proper cooling; – Blurred edges/color bleed: check resolution/vector outlines and clean film; – Uneven density on textured fabrics: pre-wet slightly or back with a backing. |
| Tips & Tricks | – Always run test prints on similar garments; – Keep precise temperature/time control; – Use alignment aids and non-slip mats; – Use backing materials to prevent ink bleed-through; – Cure film after printing and optionally after transfer; – Maintain equipment and clean surfaces regularly. |
| Advanced Considerations & Environment | – UV inks cure under light; monitor humidity and air flow; use dehumidifiers if needed; – Use a UV lamp/LED cure source with stable output; ensure consistent exposure for uniform curing. |
| Maintenance & Care | – Follow best washing practices to prolong life: turn inside out, mild detergents, avoid high heat; air-dry when possible; – Store transfers away from direct sun/heat; – Regularly inspect printers, films, and heat presses for wear. |
| When to Choose UV DTF | – Opt for vibrant color, fine detail, and fast turnaround with strong wash durability; – Suitable for complex designs, tiny text, gradients, or photo-real imagery; – Requires investment in UV-compatible equipment and careful calibration for best results. |
Summary
Conclusion

