UV DTF transfer offers vibrant color, strong durability, and a surprisingly simple workflow for custom apparel. As part of UV DTF printing, this technique uses UV-curable inks and a transfer film to move designs onto cotton, blends, and even dark fabrics. For designers exploring DTF transfer for apparel, the method delivers sharp detail and a soft hand with excellent wash fastness when cured correctly. If you’re learning how to apply UV DTF transfer, you’ll follow a clear, step-by-step process from artwork to curing and pressing. Starting with the right base tools and reliable UV DTF transfer materials will help beginners achieve consistent, pro-grade results.
An alternative framing of the same idea describes this as a UV-curable print-on-film workflow that moves artwork from film to fabric. Another term you may encounter is UV-coated transfer or direct-to-film with UV curing, highlighting the same technology from a different angle. When weighing options, readers often compare UV DTF vs heat transfer to understand differences in edge sharpness, color richness, and wash longevity. From a user perspective, this terminology shift reflects how the process integrates digital design with garment production, offering scalable results from single items to small runs.
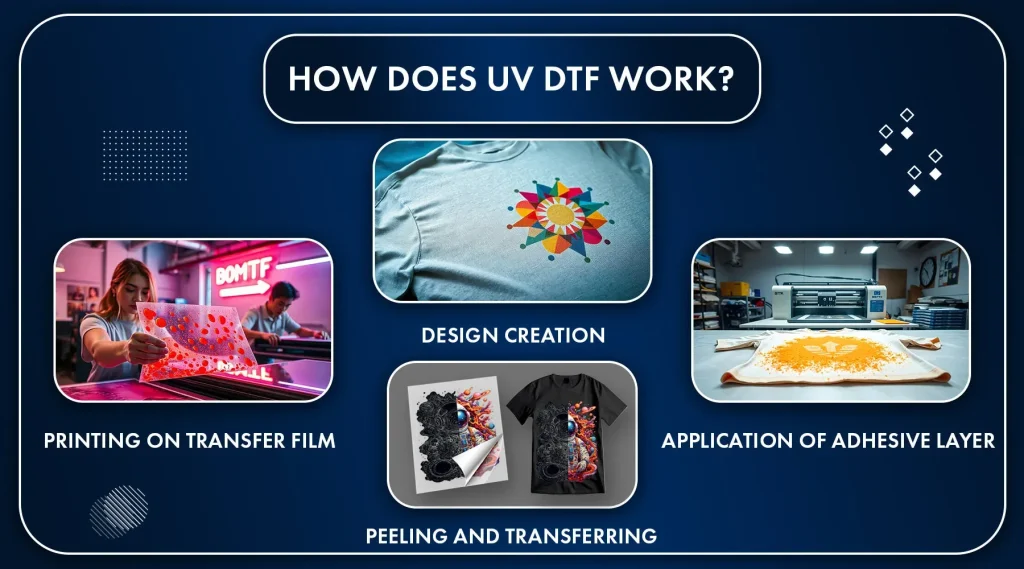
What is UV DTF transfer?
UV DTF transfer is a print-on-film process that uses UV-curable inks to move a design from a film onto fabric. When cured correctly, the result is sharp detail, vibrant colors, and strong wash durability, making it a compelling option for beginner and hobbyist projects. This approach sits within the broader world of UV DTF printing, a direct-to-film variation that leverages UV curing to set inks quickly and securely on textile surfaces.
As part of the DTF transfer for apparel family, UV DTF transfers work across a wide range of fabrics, including cotton blends and even darker materials. The film helps protect the ink from cracking or fading after repeated washes while preserving a soft hand feel on the garment.
Why UV DTF is a great option for apparel
UV DTF offers bold color and fine detail that stays vibrant through countless wears and washes. The ink chemistry and the transfer film work together to deliver a smooth surface on most common apparel fabrics, with less risk of cracking compared with some heat-based methods.
For beginners, the workflow is straightforward: design, print onto the transfer film, cure, trim, and apply with a heat press, often resulting in a comfortable finish and a matte or subtle gloss depending on materials chosen. When comparing UV DTF vs heat transfer, many designers appreciate the streamlined steps and fewer opportunities for misalignment, which supports a beginner-friendly start.
UV DTF transfer materials and essential tools
UV DTF transfer materials include a UV-curable ink setup, compatible transfer film, and a heat press, plus basic PPE and prep supplies. Selecting quality UV DTF transfer materials helps achieve consistent results, whether you are printing on light or dark fabrics, and supports reliable curing and bonding.
While you don’t need every high-end tool to start, investing in dependable materials—such as a suitable white underbase for dark fabrics and a sturdy transfer film—will improve stability and repeatability as you scale from hobby projects to small runs.
How to apply UV DTF transfer: a step-by-step guide
How to apply UV DTF transfer begins with preparing the garment, printing onto the film, and curing the ink according to the manufacturer’s guidelines. The process typically includes mirroring the image if required by the film and ensuring precise alignment before transfer.
Next, trim the film cleanly, pre-press the garment to remove moisture, and position the transfer for application. Apply with the recommended temperature, pressure, and time using a heat press, then peel the carrier according to the film’s instructions and allow the design to cool before use.
Common problems and troubleshooting for UV DTF transfers
Common problems during UV DTF transfers include ghosting, misalignment, and incomplete adhesion. These issues often trace back to improper registration, insufficient curing, or moisture in the fabric prior to transfer, so double-check each step during setup and pressing.
Other frequent concerns involve fading after washing, peeling, or color bleeding. Ensuring proper curing, following wash guidelines, and selecting a higher-quality transfer film can help, and comparing UV DTF vs heat transfer can reveal which method is more forgiving for your project and fabric type.
Care, longevity, and performance: UV DTF transfer vs other methods
To maximize the life of your UV DTF transfers, follow standard garment care: wash inside out, use appropriate water temperatures, and avoid high heat during drying. Test a sample garment first to calibrate expectations and adjust post-press times if needed.
When you compare UV DTF printing to other methods like screen printing or heat transfer vinyl, you’ll notice differences in edge sharpness, color depth, and stretchability. For small runs and on-demand apparel, UV DTF transfer can offer a strong balance of detail, softness, and workflow efficiency, making it a practical option for aspiring designers and small brands.
Frequently Asked Questions
What is UV DTF transfer and how does UV DTF printing compare to traditional methods?
UV DTF transfer is a print-on-film process that uses UV-curable inks and a transfer layer to move a design onto textiles. Compared with traditional methods such as screen printing or standard heat transfer, UV DTF printing delivers sharper detail, vibrant colors, better gradients, and a softer hand on many fabrics, with strong wash durability when cured correctly.
What are the essential UV DTF transfer materials I need to start for DTF transfer for apparel?
Key UV DTF transfer materials include a UV DTF printer or access to a service, UV-curable inks compatible with your printer, UV DTF transfer film, a heat press, teflon sheets or silicone mats, white underbase or pigment as needed, scissors or a cutting machine, a weeding tool, a pre-washed garment, and protective gloves with good ventilation for curing.
How to apply UV DTF transfer: a quick step-by-step guide?
Step-by-step: pre-press the garment to remove moisture; print your design onto the transfer film with UV DTF transfer media; cure the printed film; trim the film cleanly; pre-press the garment again; align the transfer on the fabric; apply with the heat press at the recommended temperature and time; peel the carrier sheet hot or cold as required; allow to cool and follow post-press care guidelines.
For apparel projects, how does UV DTF transfer compare to UV DTF vs heat transfer methods?
In most cases, UV DTF transfer offers sharper image edges, richer colors, and a softer hand than many heat transfer methods. It handles multi-color designs and gradients well and often requires fewer steps than screen printing for small runs. For certain single-color or budget-focused jobs, traditional heat transfer might still be a viable option.
What are common mistakes with UV DTF transfer and how can I fix them?
Common mistakes include misalignment, insufficient curing, pressing at the wrong temperature or time, and pressing onto damp or dirty fabrics. Fixes include securing the garment with proper registration, following curing guidelines exactly, using the recommended heat and duration, and ensuring a clean, dry fabric surface before pressing.
How long does a UV DTF transfer last and how should I care for it?
With proper curing and care, UV DTF transfers offer strong wash durability. To maximize life: turn the garment inside out, wash in cold to warm water, avoid high heat in the dryer, line-dry when possible, and follow any post-press care recommendations from the transfer materials vendor.
| Topic | Key Points |
|---|---|
| What is UV DTF transfer? | UV DTF transfer is a print-on-film technique using UV-curable inks and a transfer layer to move a design from film onto textile substrates. The result is a smooth, durable print with sharp detail and color depth. It works on cotton, blends, and dark fabrics, with excellent wash fastness when cured correctly. UV DTF is a form of direct-to-film technology that leverages UV curing to set inks, reduce handling time, and produce vibrant results on apparel. |
| Why use UV DTF for apparel? | Offers outstanding color vibrancy and a protective transfer film that helps prevent cracking or fading after washes. It provides a straightforward beginner workflow: design, print onto film, cure, cut, and apply with a heat press. When done right, it yields a comfortable hand on fabric with a matte or slightly glossy finish and handles complex gradients and fine lines with less risk of misalignment. |
| Materials needed (UV DTF transfer materials) | – UV DTF printer or access to a UV DTF printing service – UV-curable inks compatible with your printer – UV DTF transfer film – Heat press or flatbed press with even temperature control – Teflon sheet or silicone mats – Pigment or white underbase, depending on design/fabric color – Scissors or cutting machine – Weeding tool – Garment with smooth surface (pre-washed/ironed) – Protective gloves and good ventilation for curing |
| Step-by-step: applying a UV DTF transfer | 1) Prepare the garment (pre-wash, dry, lint-free). 2) Design artwork (high resolution). 3) Print onto transfer film (mirror if required). 4) Cure the print. 5) Trim excess film. 6) Pre-press garment. 7) Align transfer. 8) Apply with heat/pressure at recommended settings. 9) Peel and cool. 10) Post-press care and washing test. |
| Design tips and considerations | Color compatibility with fabrics; use white underbase for dark fabrics; ensure high‑resolution artwork; test layering/gradients; be mindful of texture and hand feel; calibrate colors with soft proofing and test prints. |
| Common problems & troubleshooting | Ghosting/misalignment: secure garment and good registration. Fading after wash: verify curing and follow wash guidelines. Peeling/poor adhesion: ensure clean/dry fabric and correct temp/time. Color bleeding: avoid over-inking and overly moist surfaces; pre-press and use appropriate release paper. |
| Care and longevity | Wash inside out, cold or warm water as recommended, avoid high heat in drying. Line drying can extend life. Some fading/cracking may occur on very soft fabrics; run a test garment for larger batches. |
| UV DTF transfer vs other methods | Compared to screen printing or heat transfer vinyl, UV DTF offers strong edge sharpness, rich color, and a soft hand on many fabrics. It can handle detailed images and gradients with potentially fewer production steps for small runs; choose based on project scale, budget, and end use. |
Summary
UV DTF transfer is a versatile, beginner-friendly method for creating durable, vibrant designs on apparel. This guide explains what UV DTF transfer is, why it works well for clothing, and the materials and steps needed to achieve professional results. You’ll learn how to prepare garments, print onto transfer film, cure inks, align and press the design, and care for the finished product. With careful material selection, proper curing, and attention to detail, UV DTF transfer can deliver high-fidelity prints on a range of fabrics—from cotton to dark blends—while maintaining color strength and wash durability.

