UV DTF transfer at home lets you create durable, vibrant designs without sending work to a shop. This introductory guide explains how to apply UV DTF transfers and aligns with a UV DTF transfer at home guide, walking you through prep, alignment, curing, and care. You’ll find practical tips, best practices for UV DTF transfers, DTF transfer DIY, and troubleshooting UV DTF transfers to keep projects consistent. From choosing substrates to finishing with a proper UV cure, the steps are designed for DIY enthusiasts. With the right setup and patience, you can achieve professional-looking results on a range of fabrics and surfaces.
For a broader, LSI-friendly framing, consider terms like UV-curable film transfers, direct-to-film prints on textiles, and home-based DIY print methods that share the same underlying concepts. These synonyms emphasize substrate compatibility, adhesion, curing, and finishing—concepts central to achieving durable results. In practice, the core idea remains the same: clean design, precise alignment, controlled heat, and proper curing to lock in color and wash-fastness.
UV DTF transfer at home: essential setup, prep, and curing basics
Getting UV DTF transfers right at home begins with a clean, well-lit workspace and a reliable heat source. Set up a flat pressing surface, project lighting, and protective coverings to keep dust away from your print and substrate. Following best practices for UV DTF transfers and keeping a repeatable workflow helps you reproduce consistent results and reduces the risk of misprints during cure.
Organize the essential tools and substrates you plan to use—cotton, polyester blends, canvas, and other heat-safe materials. Create a simple pre-press, alignment, and curing checklist so your DIY project follows a repeatable procedure, making the DTF transfer DIY path more predictable and less intimidating for first-timers.
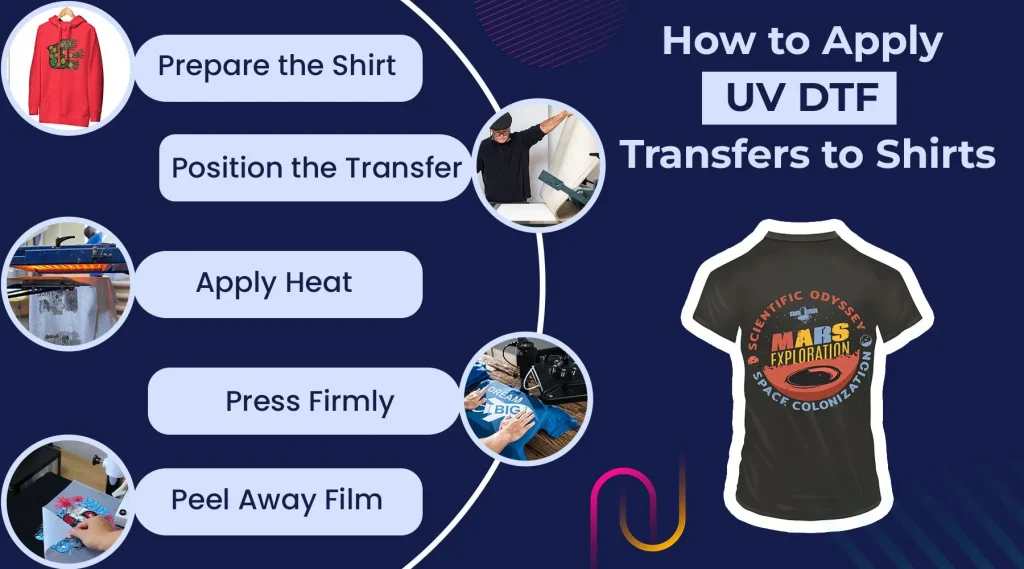
How to apply UV DTF transfers: design prep, alignment, and heat pressing
To apply UV DTF transfers, start with a high-resolution design, correct color separation, and the correct orientation for your substrate. Prepare the print with the right bleed and trim lines, then inspect the transfer for smudges or air bubbles before proceeding to press. This aligns with the idea of how to apply UV DTF transfers and ensures the image lands cleanly.
Position the transfer precisely, then apply heat and pressure according to your kit’s guidelines. Maintain steady, even pressure and avoid shifting during pressing to protect fine details. After pressing, follow the kit’s cooling and curing steps to lock in color and improve wash-fastness, completing the how to apply UV DTF transfers process with confidence.
DTF transfer DIY: affordable tools, substrates, and safety tips
DTF transfer DIY often centers on affordable tools, compatible substrates, and a careful testing mindset. Choose a transfer film, a reliable heat source (hot plate, heat press, or iron with a silicone sheet), and affordable release materials that fit your budget while delivering consistent adhesion.
Understand substrate compatibility and ink behavior by reviewing your UV-curable ink data and performing small test runs. Document results and adjustments so your DTF transfer DIY projects become incremental improvements rather than guesswork.
UV DTF transfer at home guide: from print prep to post-press care
UV DTF transfer at home guide begins with precise print prep, color management, and careful alignment to deliver sharp details on a range of fabrics. Confirm your print looks correct on the transfer medium, verify orientation and bleed according to the substrate, and check for edge bleed that could affect the final look.
Move into post-press care: let the transfer cure fully, then follow washing and handling guidelines to preserve color and adhesion. This home guide emphasizes repeatability and safety throughout the process, so you can reproduce reliable results across projects.
Best practices for UV DTF transfers: optimizing settings, color, and durability
Best practices for UV DTF transfers include optimizing heat, pressure, and timing; tailor these settings to each substrate and transfer type. Use backers or protective sheets to distribute heat evenly and reduce scorching while you learn which combinations yield the best results.
Focus on color accuracy and durability by testing with small samples, recording your parameters, and performing post-cure checks. Consistency in curing, storage, and post-care supports long-lasting results and reflects strong best practices for UV DTF transfers.
Troubleshooting UV DTF transfers: diagnosing issues and fixes
Troubleshooting UV DTF transfers: common symptoms like cracking, edge peeling, color shift, or incomplete adhesion require methodical checks. Start with presser settings or time adjustments and verify your printable artwork and color separation. A careful inspection of the transfer film and substrate helps isolate the root cause.
Next steps include reflowing parameters, re-curing as needed, and adjusting substrate choice or ink compatibility. When issues persist, consult your transfer kit support or refer to the troubleshooting UV DTF transfers resources to refine your approach.
Frequently Asked Questions
How to apply UV DTF transfers at home?
To apply a UV DTF transfer at home, prep the surface, perform a quick pre-press to remove moisture, align the transfer precisely, and apply heat at about 150–170°C (300–338°F) for 12–20 seconds with medium to firm pressure. Peel according to the kit’s guidance (hot or cold) and finish with the recommended UV curing and post-press care for a durable result.
What is a UV DTF transfer at home guide?
A UV DTF transfer at home guide covers design prep, printing, surface prep, precise alignment, heat pressing, UV curing, and troubleshooting to achieve clean, long-lasting results on various fabrics and substrates.
DTF transfer DIY: is UV DTF transfer DIY feasible at home?
Yes—the UV DTF transfer DIY is feasible at home with a suitable kit and proper safety. Ensure substrate compatibility with UV inks, run test prints on similar materials, document the settings, and follow all manufacturer guidelines for temperature, time, and pressure.
Troubleshooting UV DTF transfers at home: common issues and fixes?
Common issues include edge cracking, color fading, bleed, and transfers peeling after washing. Fixes include adjusting heat and time, ensuring full cure, checking substrate compatibility, and rechecking alignment. Start with a small test piece to dial in settings.
Best practices for UV DTF transfers at home projects?
Best practices include thorough surface prep, precise alignment with low-tack tape, using release sheets and protective covers, keeping a log of settings, curing fully per kit instructions, and following substrate-specific care to maximize durability.
How can I ensure reliable results for a UV DTF transfer at home?
For reliable results, test on similar material first, document successful temperature/time/pressure combinations, maintain a clean, organized workspace, apply consistent heat and pressure, and confirm full UV cure before washing or heavy use.
| Topic | Key Points |
|---|---|
| What is UV DTF transfer at home | Enables durable, professional-looking designs using UV-curable inks applied via a direct-to-film transfer. Enables at-home projects without sending work to a shop, with quick curing and good wash-fastness when done correctly. |
| Tools, materials, and setup | UV DTF transfer film or sheet, suitable substrate (cotton, polyester blends, canvas, etc.), heat press or iron with silicone/Teflon sheet, release sheets, heat-resistant tape or solder, protective gloves, flat pressing surface, and manufacturer’s heat settings/guidelines. |
| Designing & printing | Use high-resolution files (300 dpi+), proper color separation per printer, correct color profile, sharp image on transfer medium, and trim cleanly to minimize edge overhang. |
| Surface preparation & alignment | Start with a clean, dry substrate; preheat to remove moisture; backings for textured substrates; align transfer carefully using low-tack tape or light tack roller to prevent shifting. |
| Step-by-step application process | 1) Pre-press substrate to remove wrinkles/moisture; 2) test-fit and align; 3) apply heat/pressure per brand guidelines (typical 150–170°C / 12–20s); 4) hold pressure evenly without moving; 5) peel after cooling or as directed; 6) post-press UV cure if included. |
| Post-press care & maintenance | Cool completely before handling; avoid heavy washing for 24 hours; turn garment inside out; use mild detergents; air- or line-dry when recommended; avoid harsh solvents. |
| Troubleshooting common issues | Cracking/flaking edges: adjust heat/time/pressure; color fading: ensure complete curing and proper ink; bleed/fuzzy edges: verify alignment and add bleed margin; peel failure: increase cure time or revisit substrate compatibility. |
| Advanced tips for consistency | Test on similar material first; keep a settings log for each substrate; use protective sheets to ensure uniform heat; store transfers in a clean, dust-free place. |
| Safety considerations | Wear gloves when handling inks and cured transfers; work in a ventilated area; follow SDS for inks; dispose of waste responsibly; keep heat equipment away from children/pets. |
| Common mistakes to avoid | Skipping pre-press or failing to remove moisture; rushing curing or using incorrect settings; inadequate cooling; using incompatible substrates. |
| DIY benefits & rationale | Offers a practical middle ground between basic iron-ons and professional printing, enabling quick design iterations, durable results, and scalable DIY production. |

